UGUI ScrollRect Menu Layout – Unity3D
This post covers the basics of how to format a scroll rect UI similar to RPG shop menus.
Horizontal UI Element (Menu Title)
Start with a UGUI Image object:
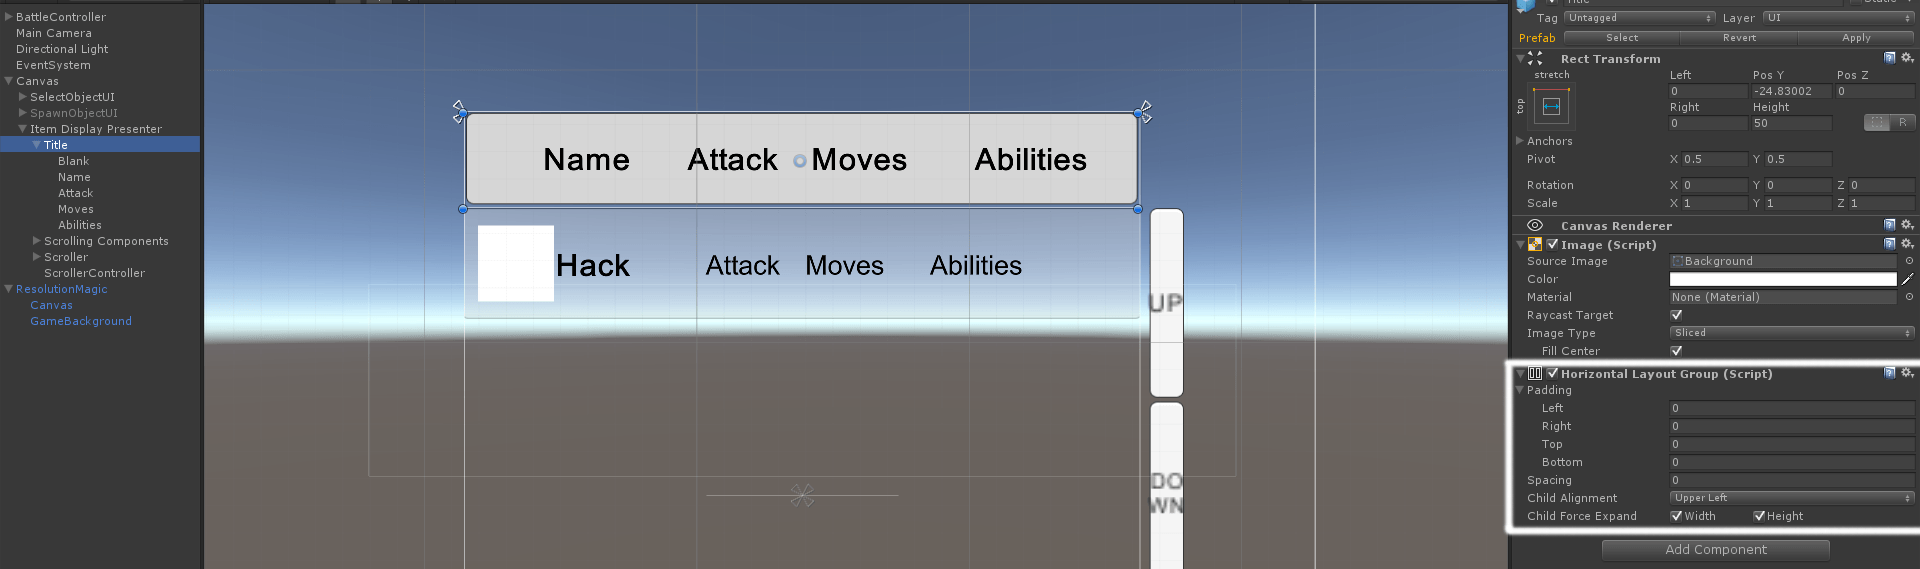
The image object is used to fill the background of the title bar.
Add a Horizontal Layout Group. This will format the title bar text objects we are about to add (Name, Attack, Moves, etc.).
Create child objects to serve as your title bar elements:
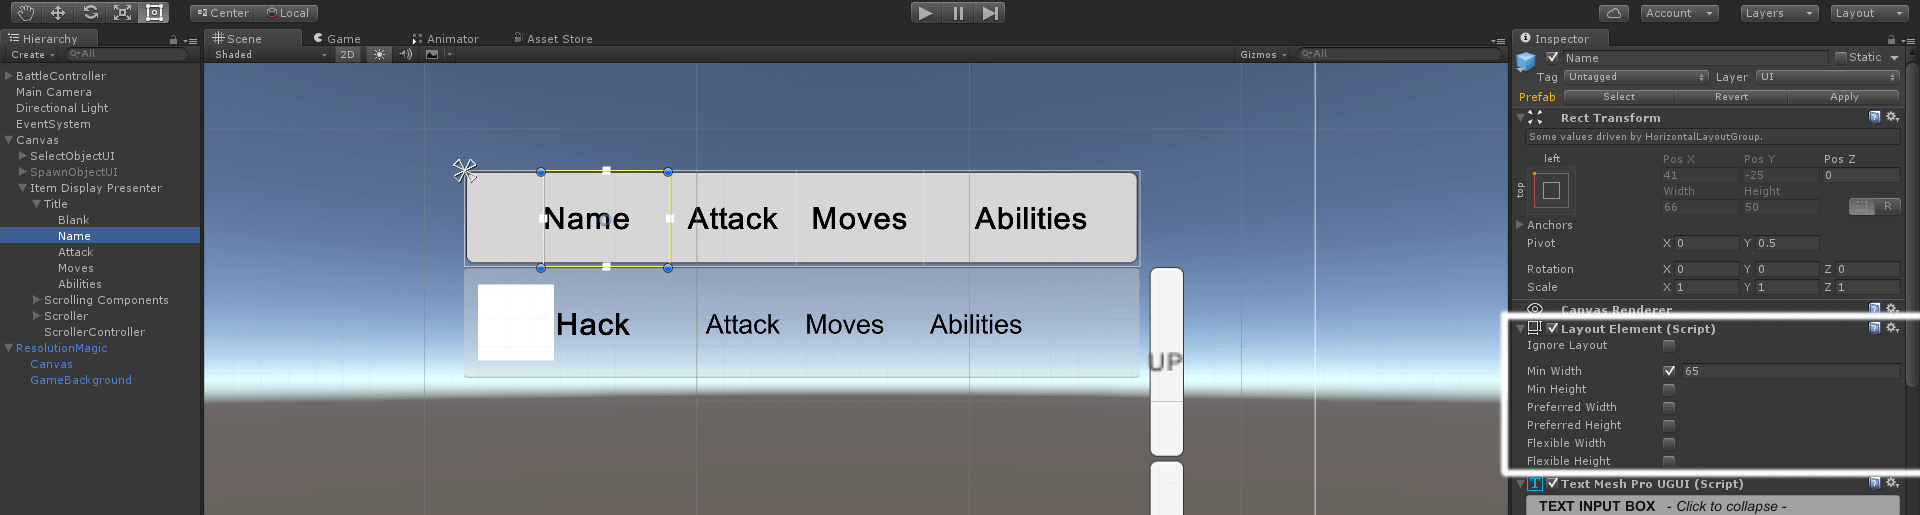
I like to use TextMesh Pro Text objects since UGUI text doesn’t look crisp at certain resolutions. Each title element (Name, Attack, etc.) should have a Layout Element component with a specified minimum width.
You’ll notice I have an object called ‘Blank’ in the hierarchy – this is used to create artificial padding in my menu.
Scroll Rect UI Element (Menu Content)
Start by creating a UGUI Scroll View. This will create a Scroll View with Viewport, Scrollbar Horizontal, and Scrollbar Vertical child objects. Since I didn’t need the scrollbars, I deleted them. I also renamed ‘Viewport’ to ‘Scroller’:
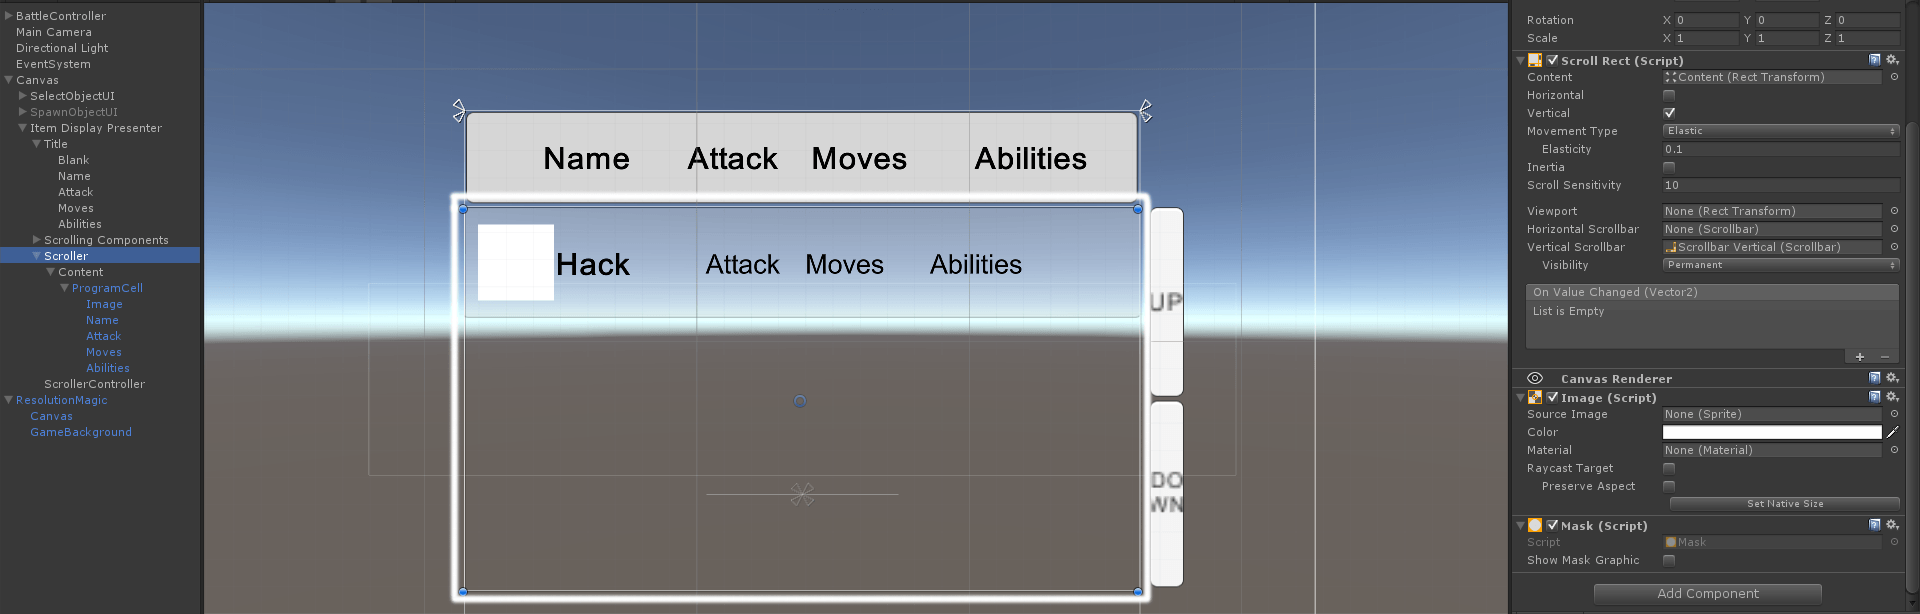
The Scroller (formerly Viewport) object has a child object called Content. Select it and add a Vertical Layout Group and Content Size Fitter:
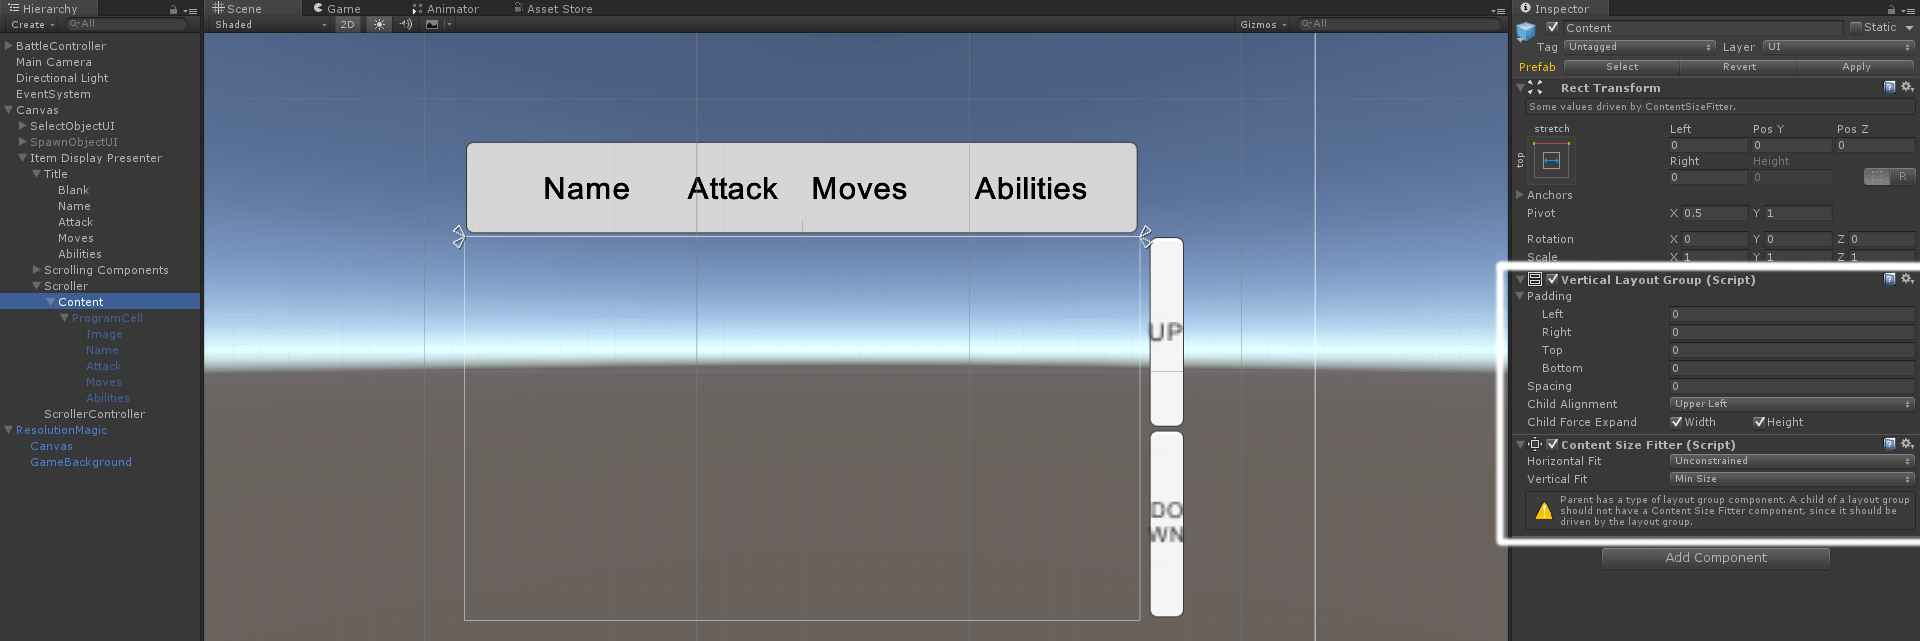
Set the Content Size Fitter’s Vertical Fit to ‘Min Size’. We leave the horizontal fit unconstrained since we will manually customize our item cell’s horizontal layout.
The Content Size Fitter shows a warning in the current version of Unity suggesting the Vertical Layout Group overrides the Content Size Fitter component, but we need both components to prevent some item cells from having display problems during runtime.
Now we are going to create the item cell. Start by creating a UGUI Image object:
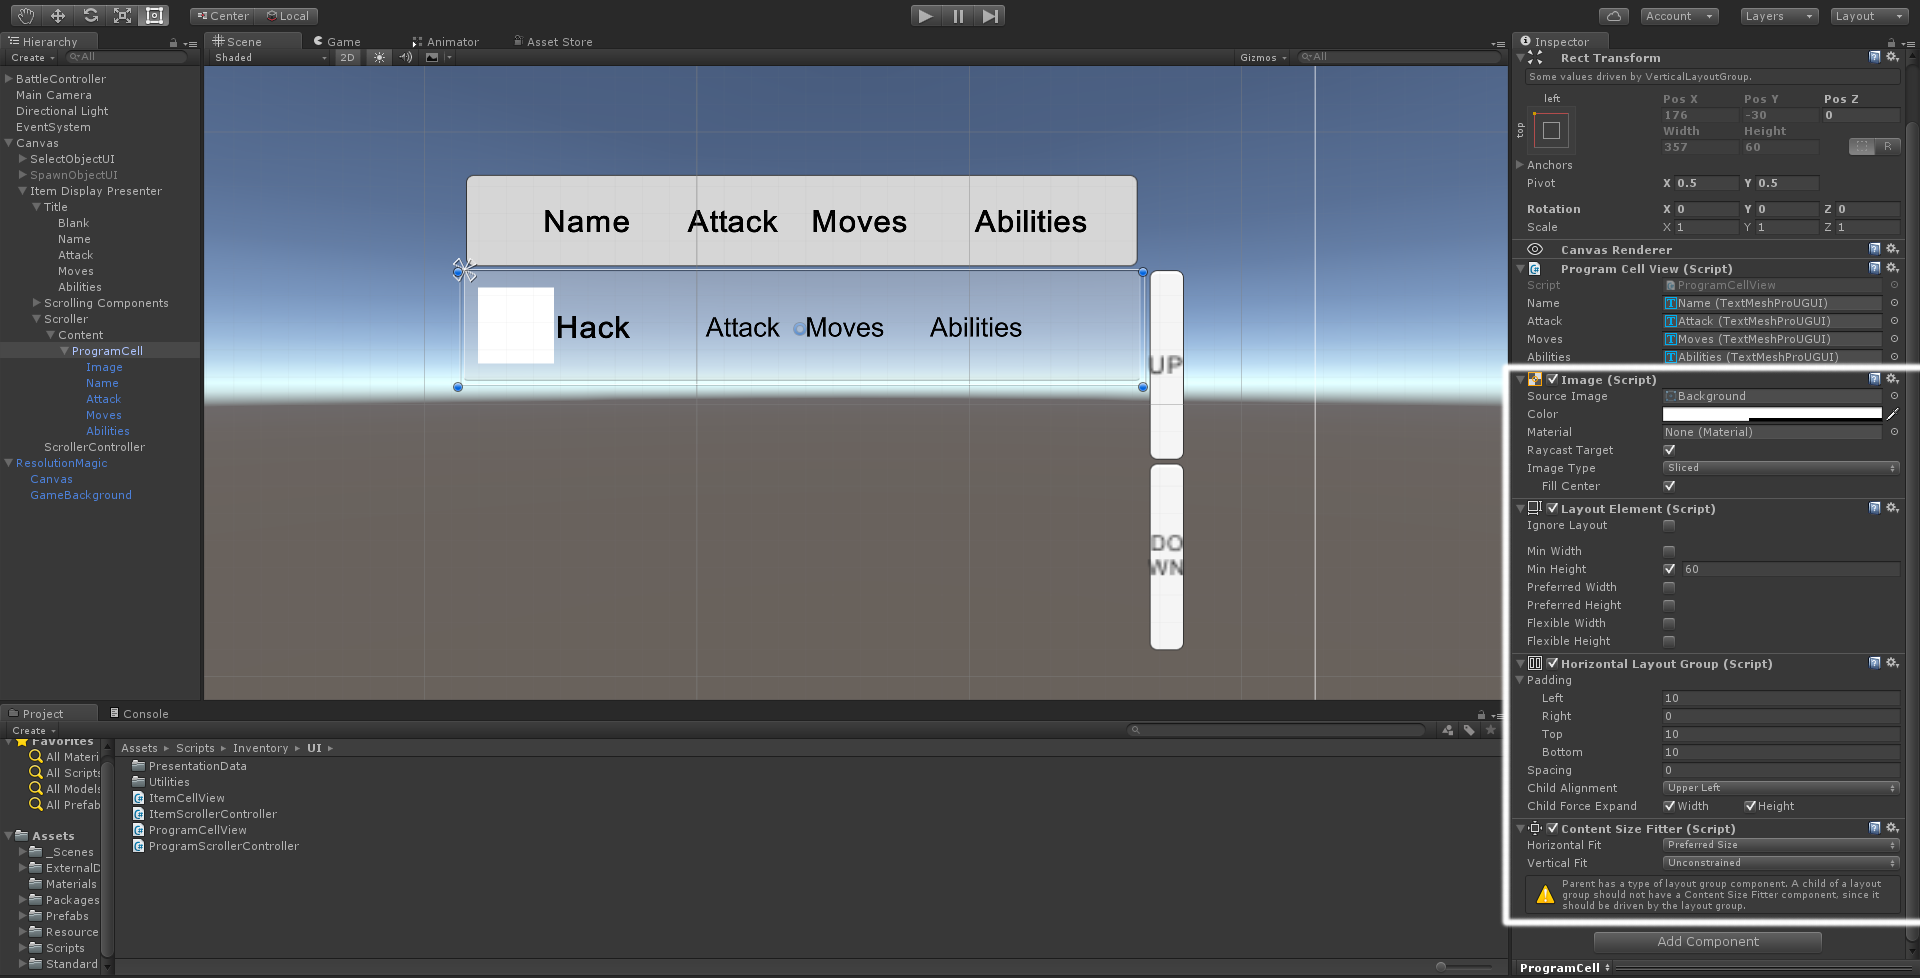
This image object serves as the background image for the item cell. Add three components: Layout Element, Horizontal Layout Group, and Content Size Fitter.
- In the Content Size Fitter, set the Horizontal Fit to ‘Preferred Size’. This will cause each child object in the item cell to fit to its preferred width we set later.
- In the Horizontal Layout Group, set the amount of padding you want between the edges of your item cell and its child objects. In the above example, my item cell objects will have 10 units of spacing from the top, left, and bottom edges of the item cell.
- Lastly, set the Layout Element‘s Min Height property. Note that we don’t need to set the width since the item cell should automatically stretch to fit the width of the Content object (formerly named Viewport).
Now it’s time to create the child objects of our item cell, such as image and text objects:

I recommend creating all the child objects you need before editing them. This is because the item cell’s horizontal layout group will automatically try to fit each object. For example, if you want your item cell to have an image and four text objects, create all of those before customizing their individual components.
Once you have created your item cell objects, add a Layout Element to each of them. Adjust their Preferred Width property as you see fit.
You now have a reusable item cell. I recommend turning this into a prefab and using it to populate the menu at runtime. I do this with a ScrollController.cs script attached to an identically named object you can see in the hierarchy above (Canvas -> Item Display Presenter -> Scroller -> ScrollerController).
ScrollerController
The ScrollerController object has a single script component, ScrollerController.cs:
using UnityEngine;
using System.Collections;
using System.Collections.Generic;
using UnityEditor;
using UnityEngine.UI;

public class ProgramScrollerController : MonoBehaviour
{
    // Config location
    public GameObject ExtractorPrefab;
    public string CsvItemExtractorPath;

    // UI display
    private List _data;
    public ScrollRect MyScroller;
    public ProgramCellView ProgramCellViewPrefab;

    void OnEnable()
    {
        // Dynamically generate path to the ExtractorPrefab.
        CsvItemExtractorPath = AssetDatabase.GetAssetPath(ExtractorPrefab);
    }

    void Start()
    {
        this._data = new List();

        // Get item data extractor
        CSVProgramExtractor programExtractor = AssetDatabase.LoadAssetAtPath(CsvItemExtractorPath);
        if (programExtractor != null)
        {
            // Get items' prefabs
            var programPrefabs = Resources.LoadAll(programExtractor.OutputFolder);
            // Set item datas
            foreach (var programObject in programPrefabs)
            {
                var item = programObject as ProgramAssetData;
                if (item != null)
                    this._data.Add(new ProgramData(item.Name, item.Range, item.Attack, item.Moves, item.Ability1, item.Ability2, item.Cost));
            }
        }
        else
        {
            Debug.LogError("A CSVProgramExtractor prefab wasn't found in " + CsvItemExtractorPath + ". Please fix this by adding this prefab there or changing the path in CsvProgramExtractorPath in the ProgramScrollerController class");
        }

        this.RefreshScroll();
    }

    private void RefreshScroll()
    {
        // Erase previous childrens
        for (int i = 0; i < this.MyScroller.content.childCount; i++)
            Destroy(this.MyScroller.content.GetChild(i).gameObject);

        // Update scroll list
        foreach (var item in this._data)
        {
            var newProgramCell = Instantiate(ProgramCellViewPrefab) as ProgramCellView;
            newProgramCell.transform.SetParent(this.MyScroller.content);
            newProgramCell.transform.localPosition = Vector3.zero;
            newProgramCell.transform.localScale = Vector3.one;
            newProgramCell.transform.localRotation = Quaternion.identity;

            newProgramCell.SetData(item);
        }
    }

    public int CurrentNumberElements()
    {
        return this._data.Count;
    }
}
You won’t be able to copy-paste this code into your project directly as my game uses external data to generate item cell data. However, this script should serve as a good starting point. In a nutshell:
- Create a list to hold your shop data.
- Get a reference to your item cell prefab (named ProgramCellViewPrefab in my project).
- Get a reference to the ScrollRect itself. This is used to clear previous item cells.
- Load prefabs (or some other resource) of the items you want to represent in the menu and then loop through them to add their data to the list.
- Create a function that updates the items in the menu. In my script, this is the RefreshScroll() function. It first clears previous item cells, then does the following in a loop:
- Instantiate a new item cell prefab
- Reset the instantiated object’s transforms
- Call the SetData() method and pass in the object data from the list
This is the ProgramCellView.cs script:
using UnityEngine;
using System;
using System.Collections;
using UnityEngine.UI;
using TMPro;

public class ProgramCellView : MonoBehaviour
{
    // Item visual representation
    public TextMeshProUGUI Name;
    public TextMeshProUGUI Attack;
    public TextMeshProUGUI Moves;
    public TextMeshProUGUI Abilities;

    public void SetData(ProgramData data)
    {
        this.gameObject.name = data.Name;

        this.Name.text = data.Name;
        this.Attack.text = "Attack: " + data.Attack.ToString() + Environment.NewLine + "Range: " + data.Range.ToString();
        this.Abilities.text = data.Ability1.ToString() + Environment.NewLine + data.Ability2.ToString();
        this.Moves.text = "Moves: " + data.Moves.ToString();
    }
}
The SetData() method populates data from a list composed of ProgramData elements (this is the list we created in ScrollerController.cs).
Here is my ProgramData definition:
public class ProgramData
{
    public string Name;
    public int Range;
    public int Attack;
    public int Moves;
    public string Ability1;
    public string Ability2;
    public int Cost;

    public ProgramData(string name, int range, int attack, int moves, string ability1, string ability2, int cost)
    {
        this.Name = name;
        this.Range = range;
        this.Attack = attack;
        this.Moves = moves;
        this.Ability1 = ability1;
        this.Ability2 = ability2;
        this.Cost = cost;
    }
}
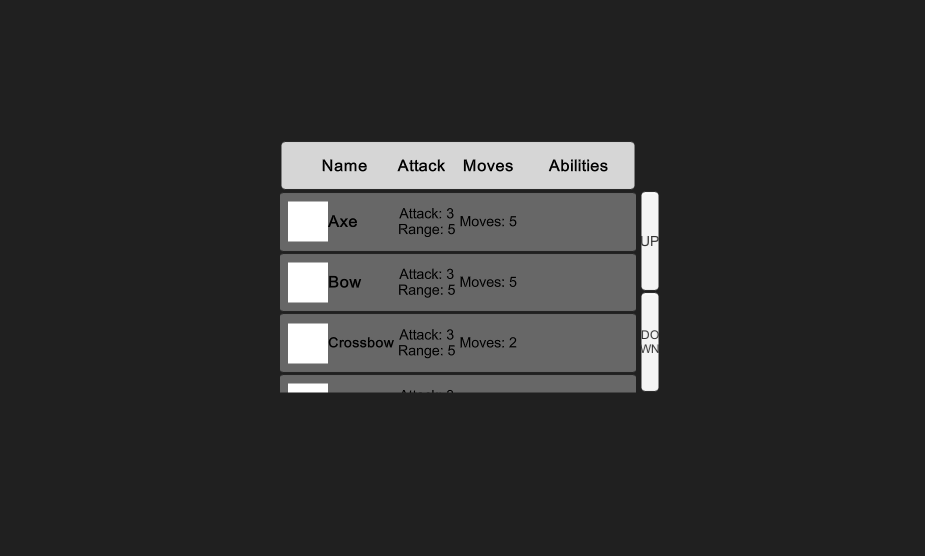
Result
Click on the GIF to view in HD.